网站接入第三方登录流程功能很常见,我们可以用第三方账号登录网站,这里主要简单介绍下整个设计思路和相关流程走通.项目DEMO示例只做了github和baidu账号的第三方登录.其他账号都大同小异的~
设计的数据库是由两个表进行相关的关联,一个用户表(user),一个第三方登录的信息表(oauth),其中user.id与oauth.uid进行关联,可以获取到用户第三方账号的信息~
相关技术栈
- 后端nodejs+mysql+thinkjs
- 前端样式Bootstrap
两个表的DDL建表语句:
第三方登录信息表
DROP TABLE IF EXISTS `oauth`;
CREATE TABLE `oauth` (
  `id` int(11) NOT NULL AUTO_INCREMENT,
  `type` char(50) NOT NULL COMMENT '类型,有 qq、github、weibo',
  `uid` varchar(255) NOT NULL COMMENT '唯一标识',
  `info` varchar(255) DEFAULT '' COMMENT '其他信息,JSON 形式',
  `user_id` int(11) NOT NULL COMMENT '用户ID',
  `create_time` bigint(13) NOT NULL COMMENT '创建时间',
  `name` varchar(255) DEFAULT NULL COMMENT '显示名称',
  PRIMARY KEY (`id`)
) ENGINE=InnoDB  DEFAULT CHARSET=utf8mb4;
用户信息表
DROP TABLE IF EXISTS `user`;
CREATE TABLE `user` (
  `id` int(11) NOT NULL AUTO_INCREMENT COMMENT 'ID',
  `username` varchar(255) NOT NULL COMMENT '用户名',
  `password` varchar(255) NOT NULL COMMENT '密码',
  `create_time` bigint(13) NOT NULL COMMENT '创建时间',
  `update_time` bigint(13) NOT NULL COMMENT '更新时间',
  PRIMARY KEY (`id`)
) ENGINE=InnoDB DEFAULT CHARSET=utf8mb4;
第三方登录说明
-
每个用户必须拥有自己的用户名和密码。
-
每个用户可以绑定不同的第三方帐户系统。
-
用户可以对第三方绑定进行管理。
-
用户可以通过已绑定的任意第三方帐户系统进行登录。
-
用户授权表中需要存放第三方系统的唯一标识、显示名称,唯一标识用来和用户、第三方系统进行关联。
-
基于 oAuth2.0 进行授权认证。
-
第三方登录回调成功后,判断当前是否登录:
已登录,刷新绑定信息。
未登录,记录授权信息,在登录、注册成功后绑定信息。
GitHub登录
-
跳转到授权页 https://github.com/login/oauth/authorize?
-
认证通过后自动跳转到回调地址,并携带 code
-
使用 code 请求 https://github.com/login/oauth/access_token 来获取 access_token ,有个小坑是,在想使用 JSON 返回值时,需要在请求头里添加 'Accept': 'application/json'
-
使用 access_token 请求 https://api.github.com/ 获取用户信息:
id - 唯一标识
name - 显示名称
参考链接:https://developer.github.com/apps/building-oauth-apps/authorization-options-for-oauth-apps/
Baidu(百度账号)登录
-
跳转到授权页面 http://openapi.baidu.com/oauth/2.0/authorize? ,需要区分下 PC 端和移动端传,参数 display 不一样,需要单独处理下
-
认证通过后自动跳转到参数 redirect_uri 中,并携带 code
-
使用 code 请求 https://openapi.baidu.com/oauth/2.0/token 获取 access_token
-
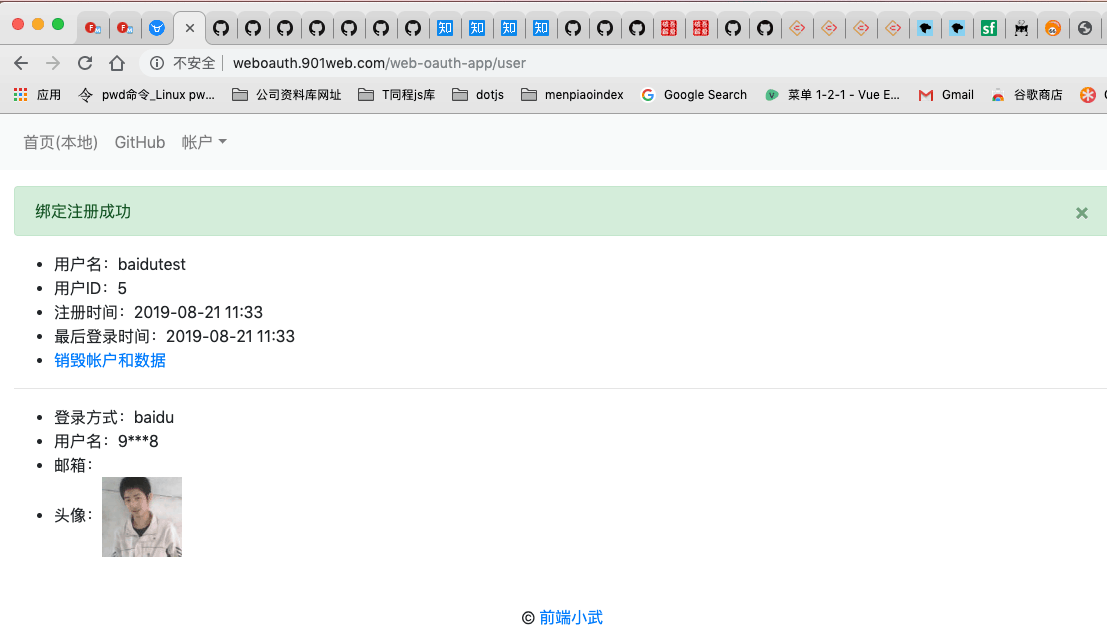
使用 access_token 请求 https://openapi.baidu.com/rest/2.0/passport/users/getInfo 来获取用户信息,最终为:
userid - 唯一标识
username - 显示名称
http://tb.himg.baidu.com/sys/portrait/item/${userinfo.portrait} - 用户头像
进入开发者服务管理里面去创建工程:
链接地址:http://developer.baidu.com/console#app/project
参考链接:http://developer.baidu.com/wiki/index.php?title=docs/oauth/application
下面主要说明Github账号登录处理的相关流程:
- 网站携带 ClientID 跳转到 GitHub 授权页面
- 用户授权后,GitHub 携带授权码重定向回到网站回调页面
- 网站通过授权码向 GitHub 请求用户令牌(Token)(验证授权码合法性)
- 网站通过用户令牌请求用户信息(或其它接口)
创建一个OAuth App
OAuth 在 GitHub 中被叫作 OAuth Apps,所以需要先创建一个 OAuth App。
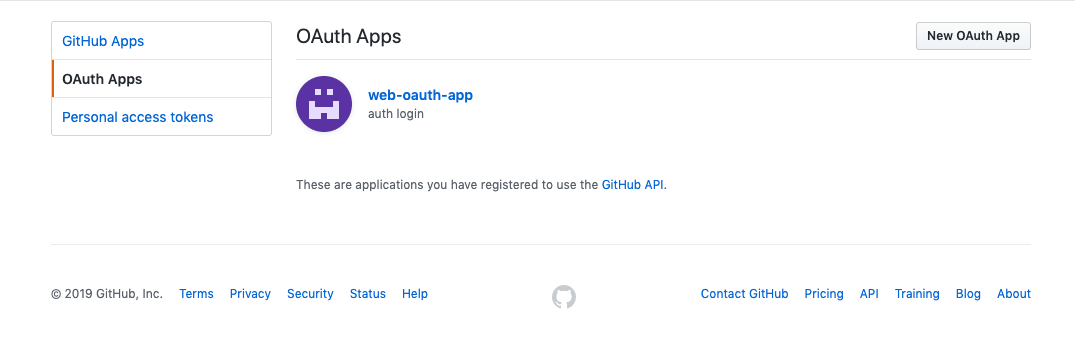
通过点击右上角头像的 Settings → Developer settings → OAuth Apps 进入到 OAuth Apps 创建和管理页面:https://github.com/settings/developers。
用于进行开发者配置,主要是client_id和client_secret,进行第三方登录.
点击右上角的“New OAuth App”进入新的 OAuth App 创建页面,需要填写的信息非常少。
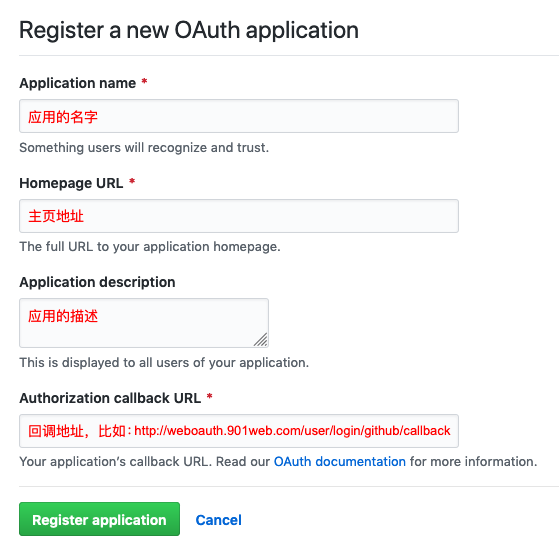
当用户点击授权后,GitHub 会携带授权码(code)回调/重定向到这个地址。 这个地址可以是任意合法的地址,比如http://localhost:8020/,在本地开发调试的使用,注意hosts里面配置不要写端口,nginx做代理即可。(这里可以配置nginx代理,修改本地hosts文件)
127.0.0.1 weboauth.901web.com
Nginx配置文件(方便本地调试):
server {
    listen 80;
    server_name weboauth.901web.com;
    root /Users/pengyongbo/Documents/nodejs-demo/web-oauth-app;
    set $node_port 8020;
    index index.js index.html index.htm;
    if ( -f $request_filename/index.html ){
        rewrite (.*) $1/index.html break;
    }
    if ( !-f $request_filename ){
        rewrite (.*) /index.js;
    }
    location = /index.js {
        proxy_http_version 1.1;
        proxy_set_header X-Real-IP $remote_addr;
        proxy_set_header X-Forwarded-For $proxy_add_x_forwarded_for;
        proxy_set_header Host $http_host;
        proxy_set_header X-NginX-Proxy true;
        proxy_set_header Upgrade $http_upgrade;
        proxy_set_header Connection "upgrade";
        proxy_pass http://127.0.0.1:$node_port$request_uri;
        proxy_redirect off;
    }
    location ~ /static/ {
        etag         on;
        expires      max;
    }
}
访问的本地代码:

点击登录,进行授权后.回调时,GitHub 会追加一个名为code的查询参数到刚刚指定的回调地址中。我们可以拿到返回的code参数~后面有用.
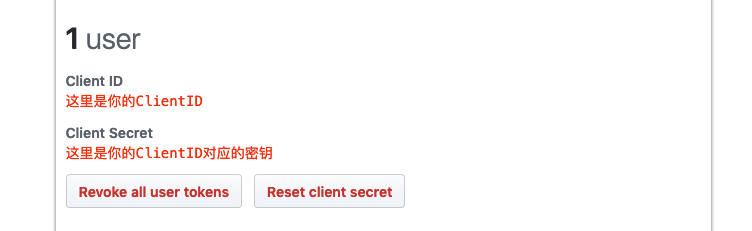
创建好后,就可以拿到 Client ID 和对应的 Client Secret,同时还可以设置一个头像。Client ID 可以公开,Client Secret 请不要泄露。
点击使用第三方登录链接,这里会跳转到Github授权页面(如果没有登录会跳转到登录页面),已经登录的就会跳转到授权页面,如下图:
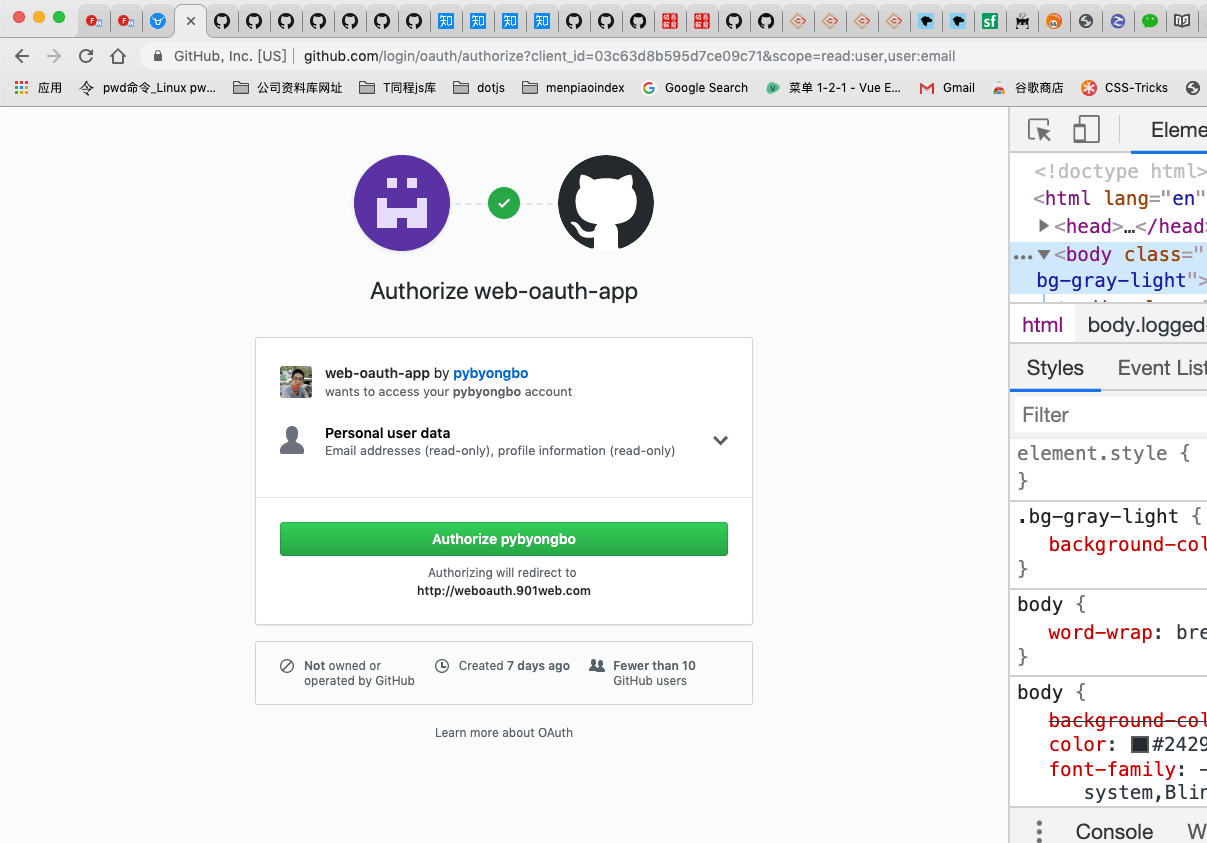
点击绿色的授权按钮后,用户就会被重定向到注册的OAuth App时的回调地址,参数中携带授权码code
后端通过授权码向Github请求用户令牌(Token)
在我们拿到 GitHub 的授权码的时候,同样需要向 GitHub 验证这个授权码是否合法,这个过程即是请求令牌的过程。
Github登录绑定账号

百度账号登录绑定
请求用户令牌(access_token)
令牌请求地址:POST https://github.com/login/oauth/access_token。
有三个必选参数:
| 字段名称 | 字段含义 |
|---|---|
| client_id | 开发者的 ClientID |
| client_secret | 开发者的 client_secret |
| code | 授权码 |
请求成功后,Github会返回令牌,即用户的token,拿到返回的用户token之后,我们就可以做很多事情啦
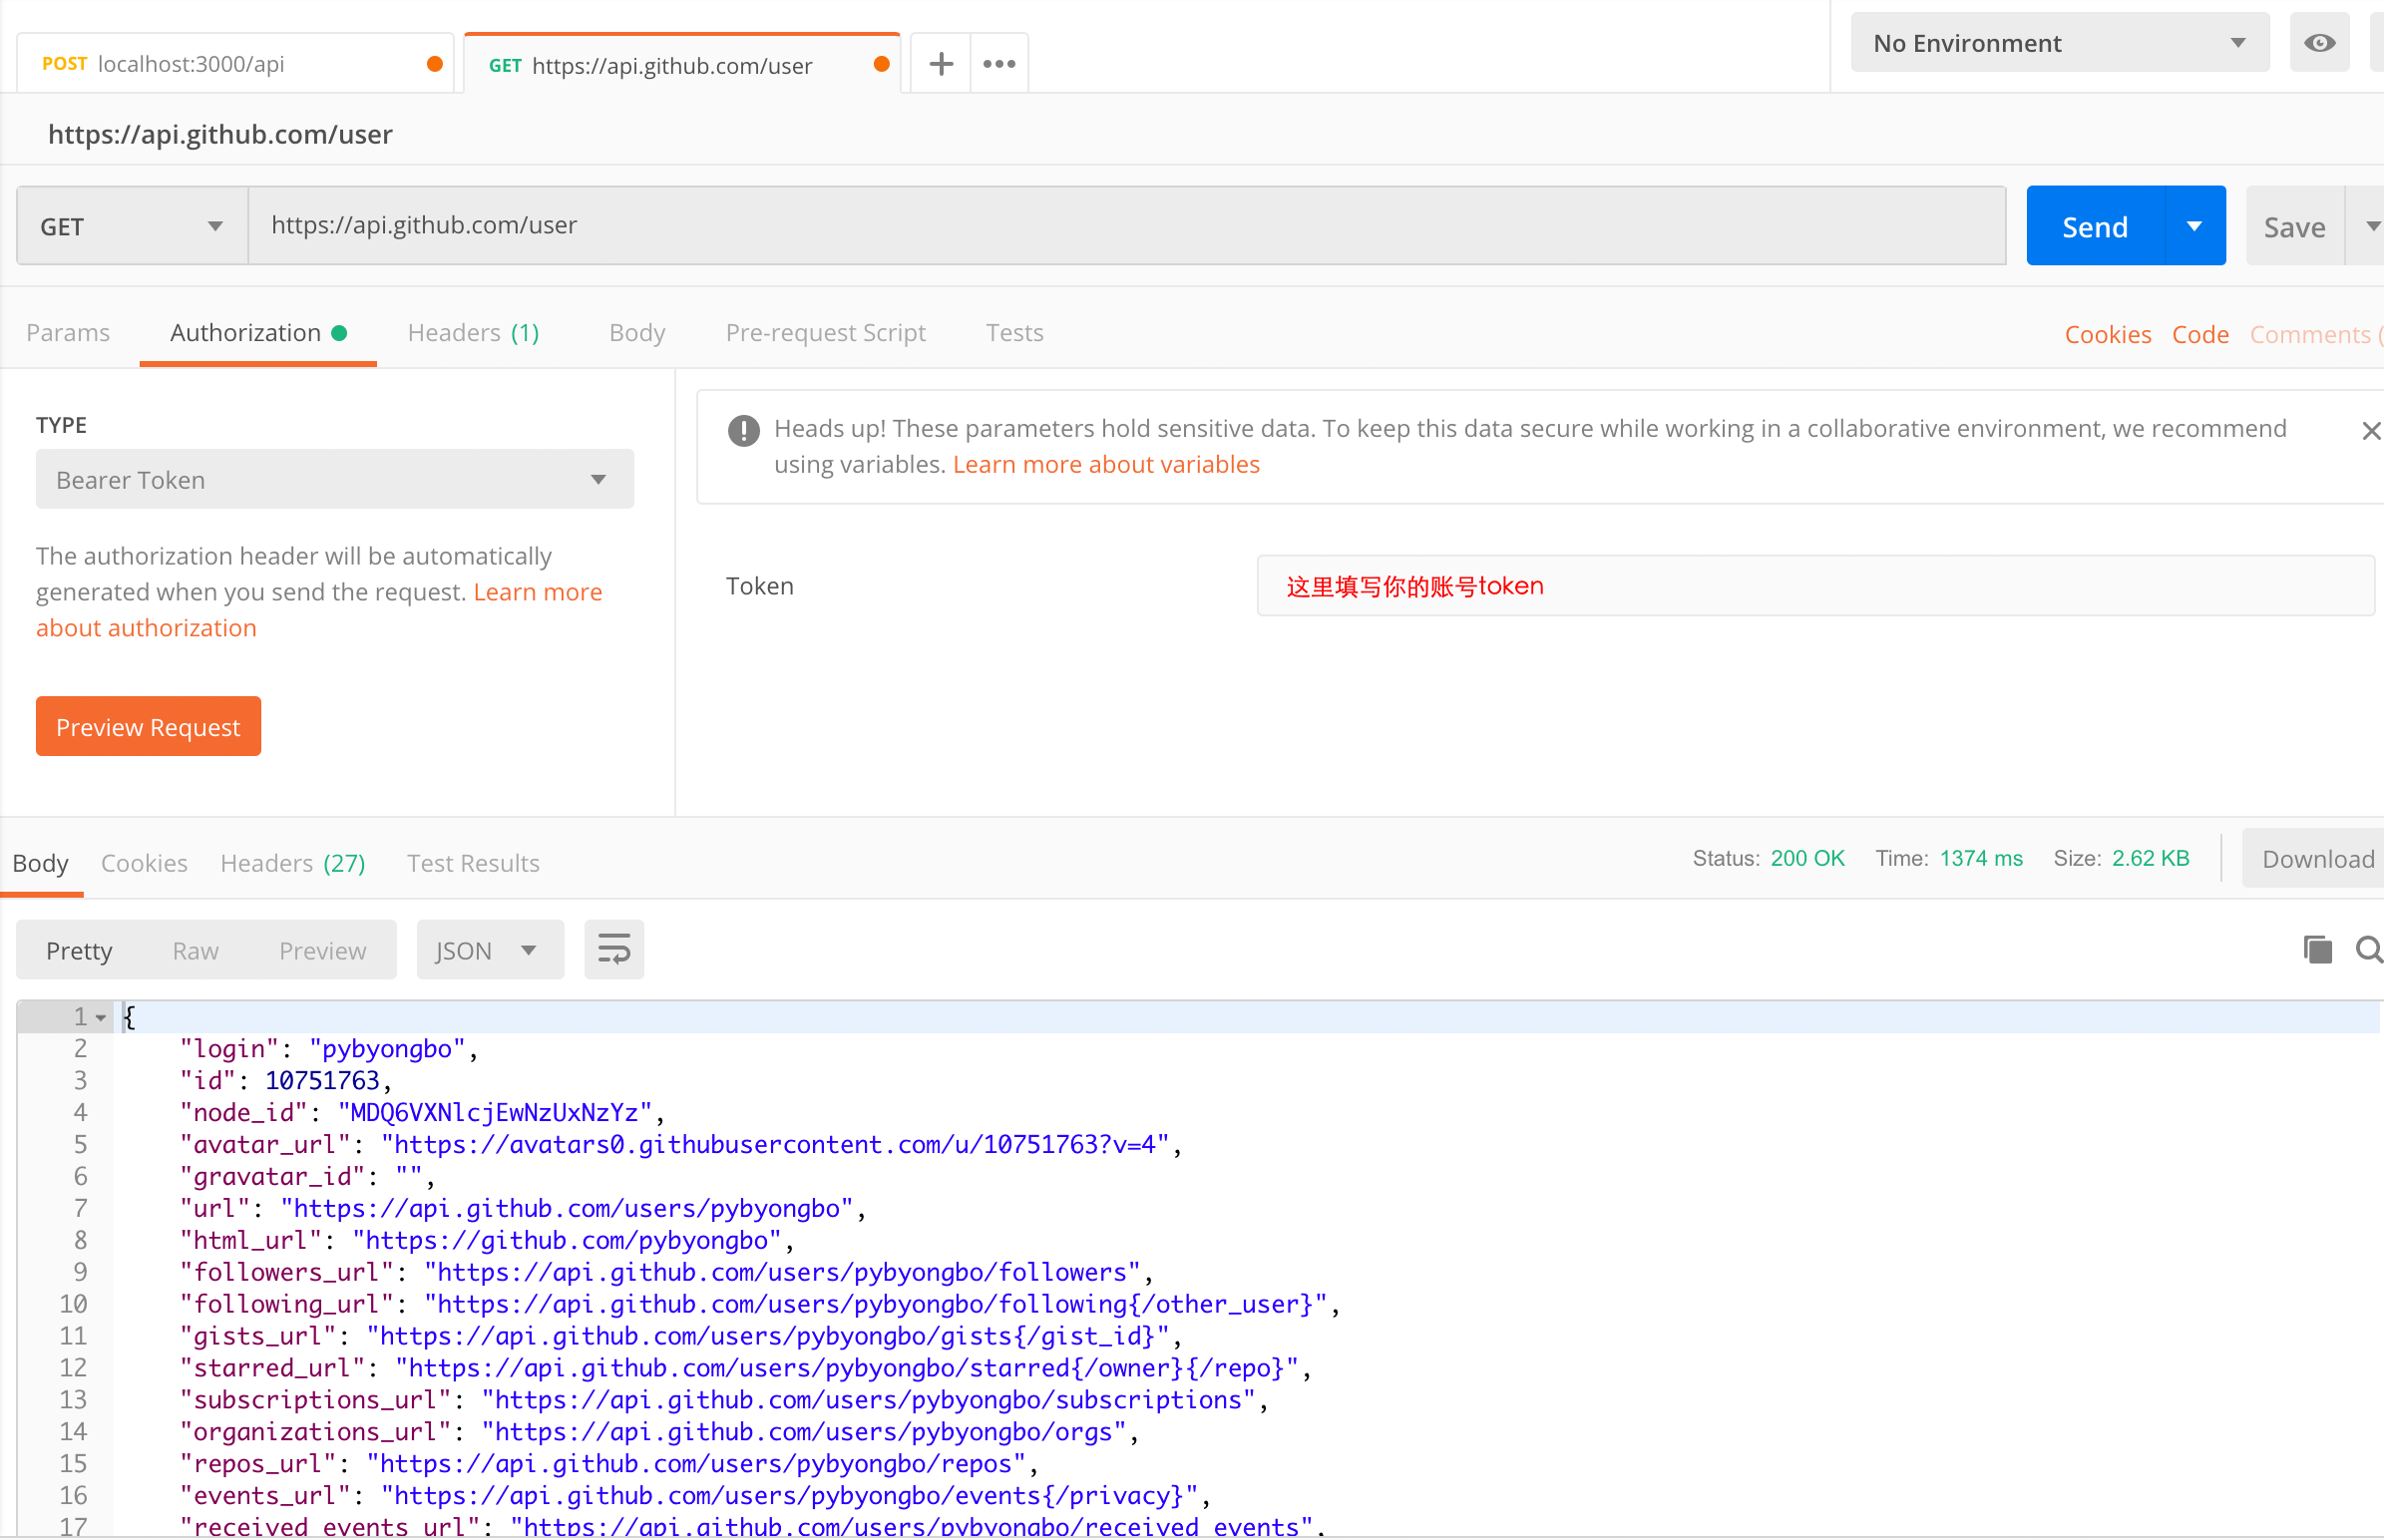
用令牌调用GitHub接口获取用户信息
拿到用户的令牌后,就可以做很多事了,今天我这篇文章只讲解获取用户信息。
用户信息接口地址:GET https://api.github.com/user。
在发请求时,需要携带用户令牌,这个令牌放在 HTTP 请求头部字段 Authorization 中。 虽然GitHub返回的是Bearer Token类型,但是API接口的要求的名字却是token,见下。
GET https://api.github.com/user

Authorization: token 用户令牌
返回信息如下:(拿token调用接口返回的用户信息)
{
    "login": "pybyongbo",
    "id": 10751763,
    "node_id": "MDQ6VXNlcjEwNzUxNzYz",
    "avatar_url": "https://avatars0.githubusercontent.com/u/10751763?v=4",
    "gravatar_id": "",
    "url": "https://api.github.com/users/pybyongbo",
    "html_url": "https://github.com/pybyongbo",
    "followers_url": "https://api.github.com/users/pybyongbo/followers",
    "following_url": "https://api.github.com/users/pybyongbo/following{/other_user}",
    "gists_url": "https://api.github.com/users/pybyongbo/gists{/gist_id}",
    "starred_url": "https://api.github.com/users/pybyongbo/starred{/owner}{/repo}",
    "subscriptions_url": "https://api.github.com/users/pybyongbo/subscriptions",
    "organizations_url": "https://api.github.com/users/pybyongbo/orgs",
    "repos_url": "https://api.github.com/users/pybyongbo/repos",
    "events_url": "https://api.github.com/users/pybyongbo/events{/privacy}",
    "received_events_url": "https://api.github.com/users/pybyongbo/received_events",
    "type": "User",
    "site_admin": false,
    "name": "pyb永不言败",
    "company": "上海摩贝",
    "blog": "https://901web.com",
    "location": "上海",
    "email": "pyb901214@163.com",
    "hireable": null,
    "bio": "Front-end Development Engineer",
    "public_repos": 43,
    "public_gists": 0,
    "followers": 0,
    "following": 3,
    "created_at": "2015-01-29T03:44:53Z",
    "updated_at": "2019-08-20T00:21:46Z",
    "private_gists": 1,
    "total_private_repos": 0,
    "owned_private_repos": 0,
    "disk_usage": 62987,
    "collaborators": 0,
    "two_factor_authentication": false,
    "plan": {
        "name": "free",
        "space": 976562499,
        "collaborators": 0,
        "private_repos": 10000
    }
}
其他第三方登录原理与流程也都大同小异.QQ开发者审核没有通过,微信好像要企业账号才可以用的.目前还没有测试.只做了Github和百度账号的测试.
DEMO外网访问地址:http://weboauth.901web.com/